Overlay Deployment

Multi-Cluster Fabric Group

In the previously steps, you added existing fabrics as children to the parent Multi-Cluster fabric. In this section, you are going to:

      Extend BlueVRF Tenant Overlay (L3VNI)
      • Navigate to the tenant configuration section.
      • Select BlueVRF and apply it to Site 2.
      • Note: Site 2 initially only contained RedVRF after brownfield import.
      Deploy Network Segment (L2VNI) to Site 2
      • Choose the desired L2 segment from Site 1.
      • Use the cross-site provisioning tool to extend it to Site 2.

No CLI Required: All configurations are centralized in the Multi-Cluster fabric view.
Unified Management: Avoid switching between fabric interfaces – all changes occur in one workspace.
Outcome: Both Layer 3 (BlueVRF) and Layer 2 segments will now span Site 1 and Site 2.

Step 1 - Multi-Attach

In your Multi-Cluster fabric, navigate to Networks to attach your BlueNet1 Network to Site2-L1.

  1. Click Segmentation and Security in the top navigation bar, then Networks
  2. Click the checkbox for BlueNet1
  3. Click Actions
  4. Click Multi-Attach

Step 2 - Multi-Attach of Networks: Switches

  1. Locate and click the checkbox for Site1-BGW1
  2. Locate and click the checkbox for Site2-BGW1
  3. Locate and click the checkbox for Site2-L1
  4. Click Next

Step 3 - Multi-Attach of Networks: Interfaces

  1. Locate and click the checkbox for BlueNet1 Site2-L1, BlueNet1 Site2-BGW1 and BlueNet1 Site1-BGW1
  2. Add to the interfaces list of Site2-L1: Eth1/5
  3. Click Next

Step 4 - Multi-Attach of Networks: Full Switch Deploy

  1. Click Save

Step 5 - Deploy Configuration

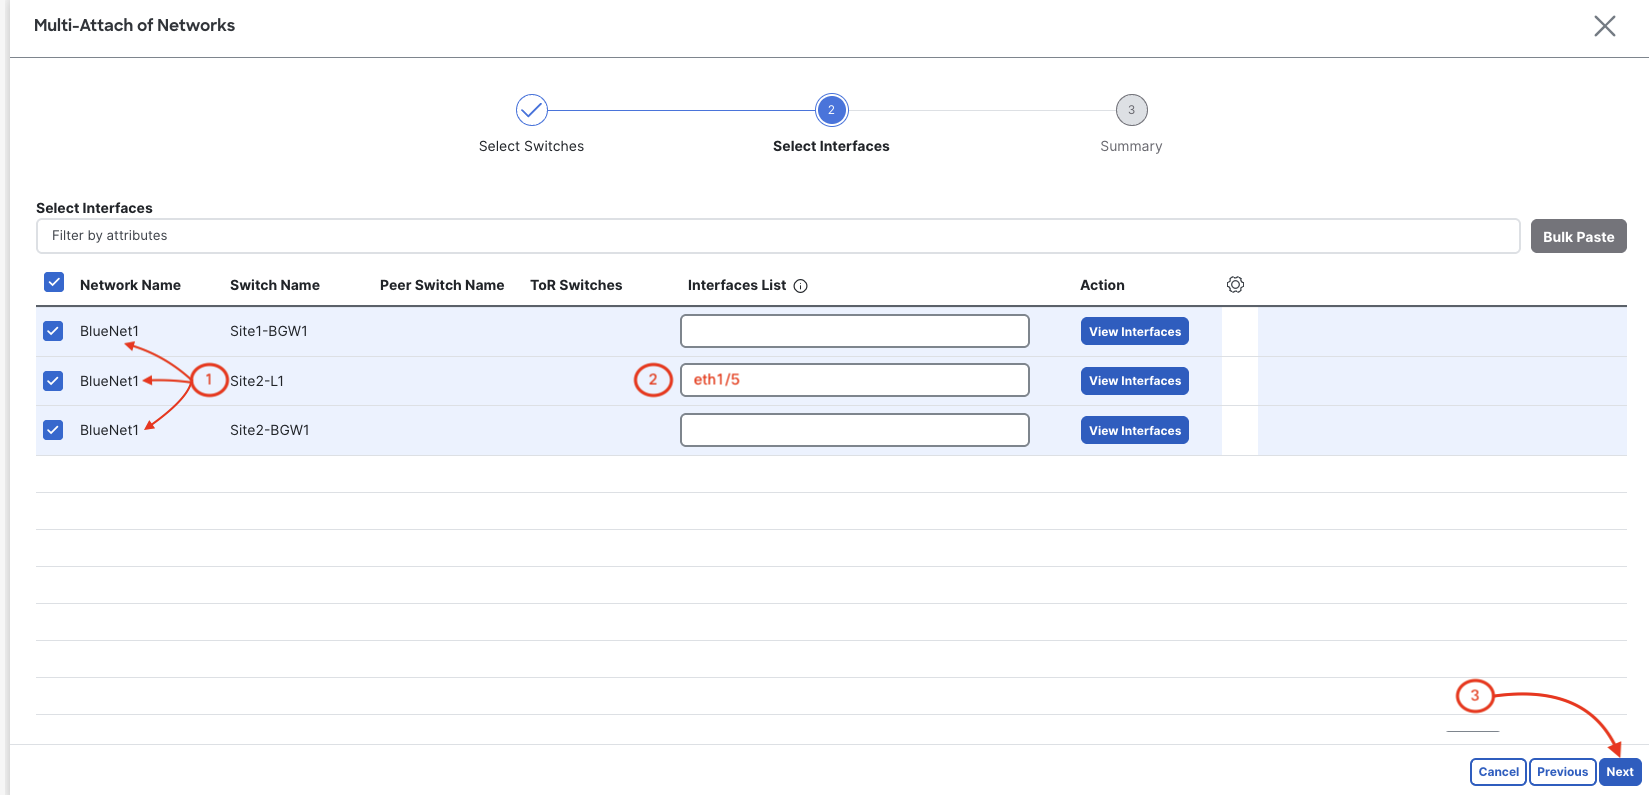
Review the configuration to be deployed, then:

  1. Click Deploy All in the bottom right
  2. The stage moves to Deploy Progress where the Network Status will show Deployment In-Progress to Deplolyment completed status:

  3. Click Close

    NOTE: During this step, you may observe that ND07-2 - ISN and ND07-2 - Site2 remain in the STARTED stage. Provided that ND07-1 displays Deployment completed, you may proceed to the next step.

Step 6 - Review BlueNet1 Network Attachments

Review and confirm your BlueNet1 network is attached to all your leaf swithces except for your Site1-BL. This attachment and deployment has extended this VXLAN EVPN L2VNI segements across your Site1 and Site2 fabrics.

  1. Click BlueNet1
  2. Click Network Attachments at top menu
  3. Review and confirm your BlueNet1 network is attached
  4. Click X Once you finished reviewing network attachments

Step 7 - Navigate to VRFs and VRF Attachments

Navigate to VRFs where you can now check your VRF Attachments to confirm that your L3VNI, BlueVRF, originally created in your Site1 fabric, has also been extended.

  1. Click VRFs at the Segmentation and Security Submenu
  2. Click BlueVRF
  3. Click VRF Attachments at top menu
  4. Review and confirm your BlueVRF is deployed
  5. Click X Once you finished reviewing network attachments

Step 8 - Revisit MSD Overview Dashboard

The MSD fabric Overview dashboard has not changed all that much, but it has updated the Extended Networks/VRFs area of the dashboard, which is infact the most import change. There are now two (2) extended networks and three(3) extended VRFs. You will need to wait 300 seconds for the NVE interface's delay-restore timer for the loopback to come up and display in the dashboard.

  1. Click Overview


Continue to the next section to verify your MultiSite environment.