Networks

Nexus Dashboard

In Nexus Dashboard, "Networks" is where you define Layer-2 VNIs (L2VNIs) and associate them with VLANs to create Layer-2 segments (bridge domains) over your VXLAN fabric. L2VNIs keep traffic segmented, preventing Layer-2 traffic from crossing VNI boundaries. If you need routing between different VNIs, you must associate the networks with a Layer-3 VNI (L3VNI) and a VRF. For routing, you can also configure an Anycast Gateway (SVI) so the same gateway IP exists on all necessary leaf switches. If routing isn’t needed, the L2VNI can remain Layer-2 only. In this lab, you’ll define two networks for inter-VXLAN routing, associating them with the L3VNI VRF created earlier.

  • Networks map L2VNIs to VLANs for Layer-2 segments.
  • L2VNIs enforce segmentation—no Layer-2 traffic crosses VNI boundaries.
  • For inter-VNI routing, associate networks with an L3VNI and VRF.
  • Configure an Anycast Gateway (SVI) if needed for routing.
  • In this lab, you’ll create two routed networks linked to your L3VNI VRF.

Step 1 - Launch Create Networks Wizard to Create First Network

  1. Click Networks in the top navigation bar
  2. Click Actions
  3. Click Create

Step 2 - Populate Create Network Wizard with First Network

In the Create Network wizard, populate the parameters to build the network configuration for your first network:

  1. Set the Network Name to BlueNet1
             Leave VRF Name set to BlueVRF
             Leave the Network ID set to 30000 (this is the first VNI pulled from the L2VNI pool)

  2. Click Propose VLAN for Nexus Dashboard to pull a VLAN from the VLAN pool that was created when you created the fabric

    In General Parameters, set

  3. IPv4 Gateway/NetMask to 192.168.11.1/24
  4. Vlan Name to BlueNet1
  5. Interface Description to BlueNet1

  6. Click Create

Step 3 - Launch Create Networks Wizard Again to Create Second Network

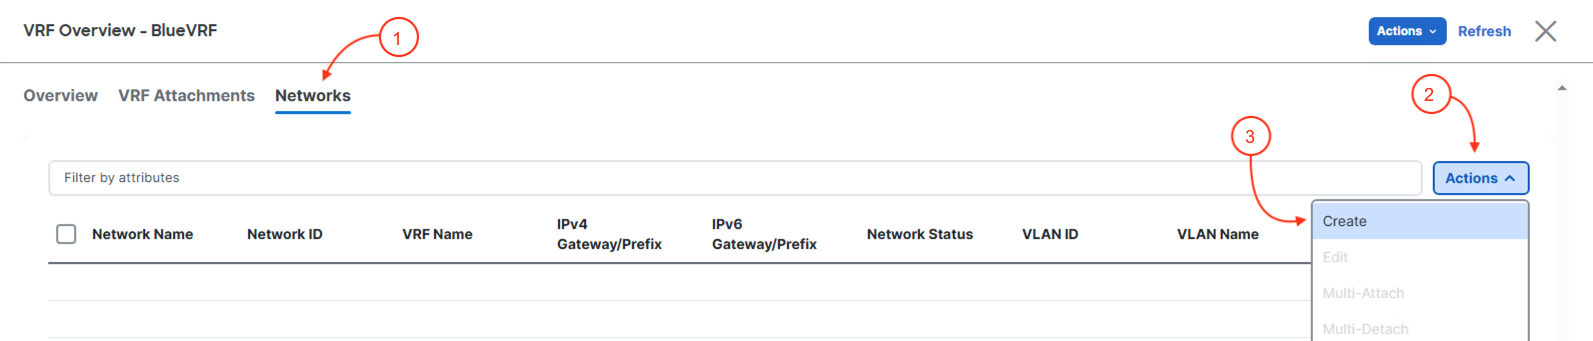
Repeat the steps above to create a second Network (L2VNI) under Networks:

  1. Click Actions
  2. Click Create

Step 4 - Populate Create Network Wizard with Second Network

In the Create Network wizard, populate the parameters to build the network configuration for your first network:

  1. Set the Network Name to BlueNet2
             Leave VRF Name set to BlueVRF
             Leave the Network ID set to 30001 (this is the first VNI pulled from the L2VNI pool)

  2. Click Propose VLAN for Nexus Dashboard to pull a VLAN from the VLAN pool that was created when you created the fabric

    In General Parameters, set

  3. IPv4 Gateway/NetMask to 192.168.12.1/24
  4. Vlan Name to BlueNet2
  5. Interface Description to BlueNet2

  6. Click Create

Step 5 - Confirm Networks are Created

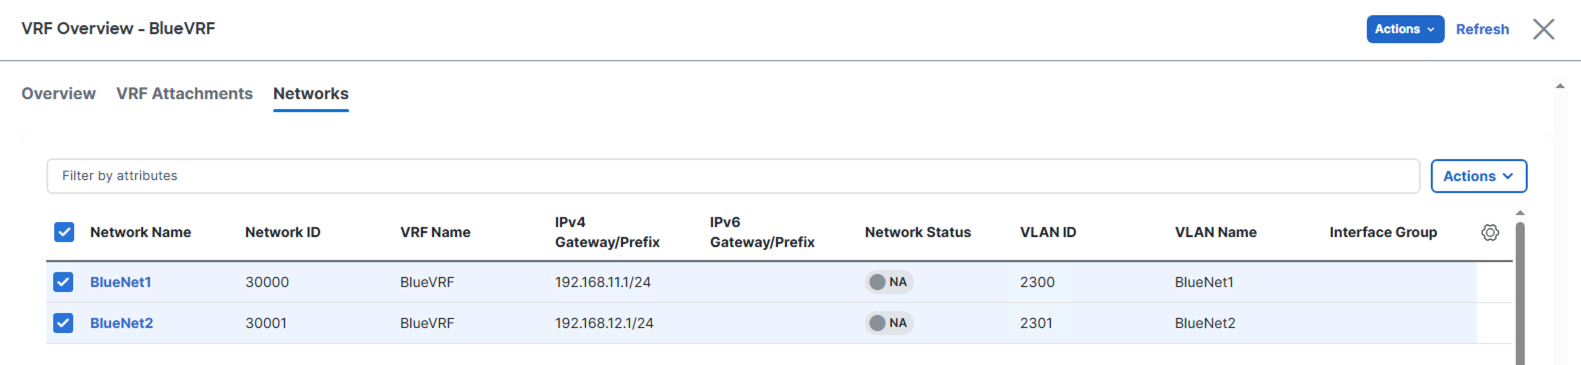
Confirm the two Networks are created. The current status should display as NA as the Networks are not attached and deployed to a leaf switch yet.


Continue to the next section to attach your Networks and subsequently attach your VRF automatically to your Site1-L1 and Site1-L2 switches.